Preventative Maintenance
Why Boats Sink (and how to keep them afloat)
The cost of repairing a boat that has been underwater, even briefly, is usually about 40% of its value. Besides having to pay the deductible, the skipper typically loses the use of the boat for several weeks while it is being repaired. The best defense against a dockside sinking?
Visit your boat. And, at least twice a season, inspect any fittings above or below the waterline that could be letting water into the boat. All too often, skippers rely on bilge pumps to bail them out when they can’t visit their boats. The pump fails and the boat sinks. If you can’t visit your boat often, consider using a buddy system with your friends to watch each other’s boats.
Modern boats sink for a variety of reasons, which is the point of this section. According to the BoatU.S. Marine Insurance claim files, for every boat that sinks underway, four boats sink in their slips. There are two reasons for this discrepancy.
One reason is whenever a boat leaves the dock, someone is aboard, which leaves open the possibility that the leak will be discovered and the problem corrected before it sinks the boat. And, reason # 2, boats tend to spend a majority of their time at the dock.
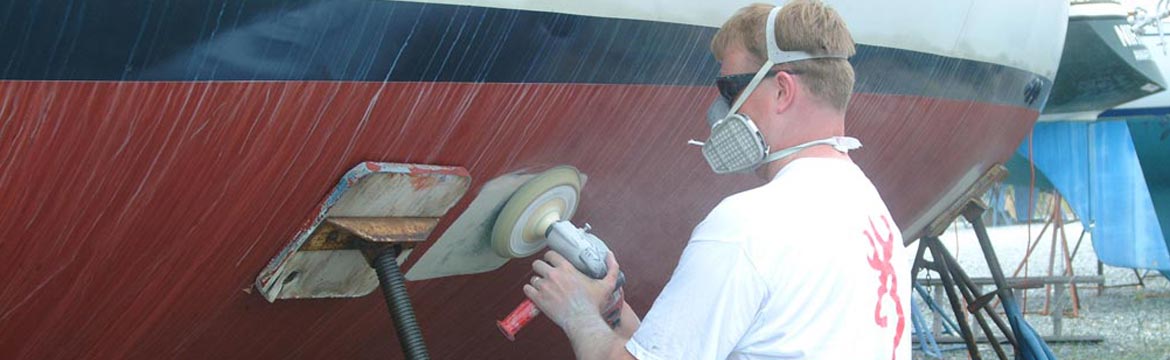
Boats with motor wells such as this have scuppers that can become clogged with debris. In the case of this boat, the access port had been opened but not resealed. Water trickled into the bilge when it rained, eventually overwhelming the bilge pump.
Why Boats Sink at the Dock
When a boat sinks at the dock, the question most likely to be asked is 'What happened to the bilge pump?' That’s the wrong question, however. By dutifully emptying the bilge periodically, a bilge pump can actually hide a problem--until the pump clogs or the battery goes dead. Water, not bilge pumps, sinks boats. The correct question should be 'Where did the water come from?'
- In 50% of dockside sinkings, water found its way into the bilge through leaks at underwater fittings. The majority of the leaks are at stuffing boxes, followed by outdrive or shift bellows, failed hoses or hose clamps, sea strainers, and drain plugs.
- There were sinkings from air conditioning fittings, gate valves, transducers, mounting bolts, and mufflers. Boats went to the bottom as a result of a leaking speedometer impeller. It is certainly possible that more than one fitting had been leaking.
- It is also interesting to note that the finger was pointed at fittings above the waterline in 9% of the sinking claims. (Question: How can a fitting that is above the waterline sink a boat? Answer: Fittings that are above the waterline aren't always above the waterline.) More on this later.
- Water from the sky, either rain or snow/sleet, accounts for 32% of sinking claims. Everybody has seen a rowboat or two awash, so this shouldn't be a surprise. What may be startling is that all of the claims involved boats with self-bailing cockpits that should have shed the water overboard.
- Boats that sank after getting caught under a dock or banging against a piling accounted for 8% of sinkings. This number does not include boats that sank during hurricanes, or the number would have been much higher.
Visiting Your Boat
The First Line of Defense Against a Dockside Sinking
If you need a reason to visit your boat more often, consider that the cost of repairing a boat that has been underwater, even briefly, is usually about 40% of its value. Besides having to pay the deductible, the skipper typically loses the use of the boat for several weeks while it is being repaired.
At least twice a season, inspect any fittings above or below the waterline that could be letting water into the boat. All too often, skippers rely on bilge pumps to bail them out when they can’t visit their boats. The pump fails and the boat sinks. If you can’t visit your boat regularly, consider using a buddy system with other boat owners to watch each other’s boats. Another alternative is to ask your marina manager to keep an eye on the boat. Many marinas offer routine inspections, but usually at an extra cost.
What to Check
Damaged Outdrive Boots
Boats frequently sink because the rubber boots on the outdrive deteriorated. According to experts, outdrive boots should be examined two or three times a year. Rubber that looks dried out and cracked (cracks are most likely to appear in the creases) needs replacing.If possible, store the outdrive down, which eliminates most creases and prolongs the life of the rubber. Finally, for whatever reason, muskrats and other water-swimming vermin like to chew on outdrive boots. "RO-PEL" a malodorous commercial product, is an effective deterrent (One source: http://www.pestproducts.com).
Damaged Mufflers
Backfiring can blow a hole in a plastic muffler. Corrosion can eat a hole in an metal muffler. Both the muffler and the exhaust hose should be inspected carefully.
Dockside Freshwater Hookups
Many boats sink because of problems in the boats' dockside freshwater systems. Water may enter through a broken fitting in the boat's hot water heater. Many sink after a hose burst (the freshwater system hadn't been properly winterized). The first line of defense against this sort of sinking is to turn off the water at the dock whenever you'll be away from the boat for more than a few hours.
There are also devices available at hardware stores that can be preset to shut off the water supply automatically. Hoses and clamps throughout the system should be inspected periodically. While you're checking, make sure there's a pressure-reducer valve and only reinforced hose (look for the criss-cross pattern if the hose is made of clear PVC) is used, which accommodates the greatly increased pressure of a city water system.
Through-hull Fittings
As a general rule, a boat whose gunwale is close to the water (low freeboard) has a greater chance of sinking accidentally. A ski boat, for example, is more likely to be overcome by rainwater, a slow leak, or a following sea than a cruiser whose impressive hull towers far above the water.
But a boat is often much "closer" to the water than its freeboard would indicate. A cracked thru-hull at the boot stripe or a cutout at the transom for an outboard motor well that isn't protected by a splash guard means that, as a practical matter, the boat has to sink only an inch or two before it floods and heads to the bottom. Inspect fittings and hoses above the waterline with the same critical eye that you used on fittings down in the bilge. Double-clamp the thru-hulls and consider adding an anti-siphon loop or check valve to any that are within 8" to 12" of the waterline.
Scuppers and Drains
Even aboard boats with cabins and self-draining cockpits, it isn't unusual to have a leak or two at hatches, ports, chain plates, etc. Caulking these leaks keeps water out of the bilge and also may prevent costly structural repairs later. Open boats and boats with especially low freeboard should be hauled for the winter in colder climates, as they are prone to being shoved underwater by snow and ice.
When scuppers are clogged with leaves or debris, water backs up and has a tendency to find a way into the bilge. Two other sinkings occurred because scuppers were cracked or broken scuppers and water leaked into the bilge.
Seacocks & Valves
According to voluntary industry standards, seacocks or gate valves, which can be closed in an emergency or when the skipper is away from the boat for extended periods, must be used at all thru-hulls below the heeled waterline. The valves and fittings must be made of bronze or Marelon®, which are not likely to break when struck accidentally with a foot or anchor. (RC Marine's Marelon® seacocks are the only plastic seacocks that meet the requirements of Underwriters Laboratories.).
Seacocks are widely regarded as being more reliable than gate valves. In an emergency, a quick glance at a seacock will tell you whether it is open or closed. With a gate valve, you can't tell. Gate vales also have a reputation for failing internally because the different metals-steel inside, bronze outside-aren't compatible. Look for a pinkish color on the bronze, which indicates corrosion.
Other thru-hulls that need inspecting periodically are transducers and raw-water intake strainers. Ice can bend a strainer that isn't winterized properly. You should either drain the bowl or fill it with antifreeze. Even if the seacock has been closed for the winter, water can enter the boat when the seacock is opened in the spring.
Removable transducers and impellers must be locked in place securely or they can work loose and sink the boat.
Boats sink when hoses slip off the seacocks' nipples. Hoses connected to the fittings must be double-clamped with stainless steel clamps. Rusted clamps should be replaced.
Boats sink because a hose split. Hoses at thru-hulls should be the reinforced type, which is usually a heavy black hose. Lighter, unreinforced PVC hoses can (and do) rupture and crack. Check the entire length of the hose, as excessive heat from the engine or chemicals (bilge cleaners, battery acid, etc.) can cause isolated failures. Replace any hoses that are suspect.
Keep the Boat Away from the Dock
Boats sink because they either get caught under the dock or bang against the dock. Bow, stern, and spring lines should be arranged to keep the boat in the center of its slip.
Fenders and fenderboards can be used to cushion minor bumps but they will not overcome a poor docking arrangement. Double up on lines and use chafe guards if the boat is in an exposed location.
Plastic thru-hulls turn brittle and eventually crack form ultraviolet (UV) sunlight. Failures usually occur inside the thru-hull opening. If the thru-hull is only an inch or two above the waterline, rainwater or snow accumulations can force it underwater and sink the boat.
A plastic thru-hull that was an inch or two above the waterline cracked and the weight of the snow lowered the damaged fitting to just below the surface. The boat gradually filled with water and sank.
This shift bellows cable was not found until after the boat had sunk.
Why Boats Sink Underway
Any boat has the potential to sink underway for the same reasons that it could sink at the dock--a hose slips off, a packing gland leaks, etc. Many boats sink because of leaks at thru-hulls, outdrive boots, or the raw water cooling system, all of which are routinely implicated when boats sink at the dock.
There are also many other reasons that boats sink underway, however, which have nothing to do with loose hose clamps or broken fittings. Boats underway can strike floating debris or stray onto a rocky shoal (“Navigation error”). There are careless skippers who forget to install drain plugs. Many boats sink after coming down hard off of waves and splitting open.
Once a boat starts to sink, it will gain momentum as it settles into the water. If a boat has a two-inch hole that is a foot below the waterline, for example, over 78 gallons of water will pour into the boat per minute. When the same hole is three feet below the surface, the flow of water increases to 136 gallons per minute. Keep in mind also, that other thru-hulls that had been above the waterline will be underwater. If any of these fittings are cracked or missing, the flow of water into the boat will accelerate further.
What to Watch
Low Transoms
The single most critical reason boats are flooded on open water has to do with transom height. Most boats that are swamped are outboard powered, with engine cut-outs that are often only inches above the waves. Motor wells are supposed to be the second line of defense when a wave comes over an outboard's transom but, in some cases, the well is too low, too shallow, and/ or not sealed adequately to the cockpit. Scuppers in the motor well and cockpit may also be slow to drain, especially if they re clogged. And whenever water lingers in the well or cockpit, the chances of another wave coming aboard increases. So too is the risk of being swamped.
Aside from transom height, the other contributing factor when a boat is swamped is typically weight distribution-- too many people at the stern together with scuba tanks, large coolers, bait wells, etc. that reduces buoyancy aft. In most cases, swamping occurs when the boats are stopped or idling.
Prevention
Especially on outboards with low cut outs, be conscious of weight distribution. Avoid storing scuba tanks, heavy coolers, etc. near the transom At slow speeds, keep the boat moving toward the waves. Don't ever anchor from the stern!
Most scuppers are slow to drain anyway, but when they're plugged up with leaves and other boat-gunk the water can linger in cockpits and motor wells a dangerously long time. Use a dockside hose with a power spray nozzle to flush out debris.
Cooling System Leaks
A 300-hp engine pumps approximately 30 gallons of water through the cooling system every minute. Depending on which fitting lets go, you could find yourself with the water pouring into the bilge at the same time the engine overheats, which means you're liable to be greeted by clouds of hot steam when you open the engine hatch.
Which fittings are most vulnerable? Any fitting that is loose or corroded can let go. In one case a cooling water pump hadn't been adequately tightened. On other boats, hoses slipped off, a raw water heat exchanger burst (end cap), and a plastic muffler split open when the engine backfired.
Prevention
All of the fittings in the cooling system should be inspected periodically for loose connections and brittle or split hoses. Typically, a break in the cooling system will cause the engine to overheat before much water has been pumped overboard. The hatch is opened, the problem is discovered, and the boat can usually be saved. The exception is a break in the exhaust or muffler. Backfiring can blow a hole in a plastic muffler, corrosion can eat a hole in a metal muffler, exhaust hoses can split and the engine will continue to pump water--a lot of water--aboard.
Striking an Object
Submerged or partially submerged boards, logs, etc., are typically swept into rivers and bays after large rain storms and have been responsible for damaging and even sinking many boats.
Prevention
Slow down whenever you see floating debris. For every log visible on top of the water, there is likely to be two that are bobbing just below the surface. If you do strike something, indicated by an ominous "klunk" somewhere on the hull, open the engine hatch immediately and make sure the boat isn't taking on water.
Spring Fitting Out Checklists
A complete safety inspection of the engine, hull, and other systems should take, at most, only an hour or two. And attention to detail this spring can make the upcoming boating season a lot safer and more enjoyable.
Out of the Water
Inboard Motors
- Replace deteriorated zincs. They disintegrate, giving you a good indication of what would happen to underwater machinery if zincs were not present. Zincs that disappear after one season indicate a serious problem with the boat's bonding and/or electrical system.
- Inspect prop(s) for dings, pitting, and distortion that can cause excessive vibration and can loosen everything on the boat. Worn or loose props also cut down your top end speed and fuel economy.
- Inspect the hull for blisters, distortion, and stress cracks. While small blisters may be dried, sanded and filled, larger blisters may require professional attention. Distortion and stress cracks should also be addressed by a professional repairman.
- Inspect and lubricate seacocks. Hoses and hose clamps (two at each fitting below or near the waterline) should be inspected and replaced as necessary. This is also the best time to replace gate valves, if any, with seacocks. Gate valves are prone to failure and are not as reliable as seacocks. You also can't glance at a gate valve to see that it is closed.
- Make sure engine intake sea strainer(s) are free of corrosion and is properly secured. Strainers that were not drained properly in the fall could have been bent by ice over the winter.
- Inspect the rudder and rudder post to make sure they aren't bent or damaged. Any looseness must be corrected.
Outboard and Outdrive Motors
- Inspect rubber outdrive bellows for cracked, dried, and/or deteriorated spots. Look especially in the folds! A bellows that is suspect should be replaced.
- Replace deteriorated outdrive zincs.
- Check power steering and power trim oil levels. Follow Manufacturer's maintenance schedule or use factory-authorized mechanic.
Additional Preventative Maintenance
- Inspect all control cables especially the steering and throttle cables. Check rods, connection parts and outer jackets by working the wheel or throttles back and forth. Stiff operation or a crunching sound indicates a potential problem.
- Clean and inspect all battery terminals and connections. Loose connections can "arc," which creates an enormous amount of heat and is a fire hazard. Use a brass wire brush for badly corroded components and fill battery cells with distilled water.
- We can't say enough about the importance of keeping a clean bilge. Routinely check for items that can foul a bilge pump. Leaves, left over construction debris, even human hair--you name it, can often find its way to the pump and clog its operation.
- Regularly inspect deck components for leaks or weakness. A loose hatch or window is essentially a great big hole if it were to suddenly give way. Or, a loose boy pulpit or lifeline could mean that someone might suddenly end up in the water.
- Check that your ground tackle (anchor, rode and shackles) are in good order and coiled or stowed properly. The anchor's flukes can often entangle with the rode and can make it difficult to deploy in an emergency. Loose shackles should be tightened. Replace rusted ones.
- Stoves and remote tanks should be examined for loose fittings and leaking hoses. All infrequently used canisters, spare tanks--even cleaning solvents should be stored ashore. They are corrosive if they leak, and a huge fire hazard.
- It should be drilled in by now, but all safety gear needs to be inspected regularly for proper functioning and expiration dates if applicable. Don't forget to inspect flares, contents of the first aid kit, fire extinguishers and life jackets.
Fuel System Maintenance
"Give a diesel engine clean fuel and it will run forever."
This old saw is less of an exaggeration than you might think. Repair statistics show that 90% of diesel engine problems stem from contaminated fuel. The promise of eliminating 9 out of 10 potential failures should put fuel-system maintenance at the top of your list.
Start with Clean Fuel
Don't make your task more difficult by taking on contaminated fuel. The bad things that happen to diesel fuel inside your tank, which I am going to describe momentarily, also occur inside the supplier's storage tanks. That isn't a problem for you if the fuel is efficiently filtered on the way to the nozzle. If you have any doubts about the cleanliness of the fuel, pump some into a clean glass jar and let it sit a few minutes. Water and dirt will settle to the bottom. If you see either, filter the fuel before it goes into the tank, or better yet, buy your fuel somewhere else.
Keep out Water
Gasoline engines can ingest a certain amount of water with the fuel without serious consequences, but if a single droplet of water in diesel fuel makes it all the way to the cylinder, the sudden steaming of the water can blow the tip right off an injector. This is the reason for having a water-separating filter, but too much water in the fuel can overwhelm this filter.
If you took aboard dry fuel, shouldn't it stay dry inside your tank? No. Contaminated fuel is only one way water gets into the fuel aboard boats. It also leaks in around the fill cap, it is occasionally driven in through a flooded vent fitting, and it forms inside the tank as condensation.
You already know to check any doubtful source to protect against pumping fuel aboard that already has water in it. But have you ever checked the seal on your deck fill? Some have O-rings (missing?), some have gaskets, and some depend on tight metal to metal or plastic to metal contact to seal. Side-deck deck-fills, especially on sailboats, can spend a lot of time under water and are often the primary source of water contamination. If the cap's seal isn't airtight, replace the gasket or the fitting.
Where is the tank's vent fitting? If it is on the side of the hull, deep heeling or heavy rolling might submerge it, admitting water into the tank. If it is through the transom, a following sea might drive water back into the tank. Even when it is located in the cockpit or on the cabin side an errant wave might engulf it.
Water also condenses out of the air inside the tank. Due to the daily heating/cooling cycle, a small amount of moisture will condense out of the air every day. The more air in the tank, the more potential for condensation, so it is a good idea to keep tanks topped off, especially while the boat is not being used.
Prevent Algae
Like mold on bread, algae and fungi can thrive inside fuel tanks. These microbes require both fuel and water, so the drier the fuel, the smaller your algae problem is likely to be. However, keeping all water out of the fuel is improbable, so diesel fuel should always be treated with a biocide to prevent the growth of microbes. Avoid products that contain alcohol, which attacks O-rings and other rubber parts in the fuel system.
Tank Care
No matter how meticulous you are about the fuel you take aboard, dirt, water, and microbes-dead or alive-accumulate in the bottom of the tank over time. They may seem harmless enough just lying there, but the first time you are motoring in bumpy conditions, they get churned up and find their way to the fuel pick-up, either in small amounts or in big gulps. If you are lucky, this contamination simply plugs your primary filter and starves the engine of fuel until it dies-hopefully not at some critical moment. If you are unlucky, some of this debris finds a way past the filters and damages the injector pump or the engine.
It is advisable to clean out the tank periodically. How often depends on fuel quality and even tank material, but every couple of years you should at least draw some fuel from the very bottom of the tank to check for water and/or sediment. You cannot do this through the pick-up tube feeding the engine because it is an inch or so above the bottom. If the tank doesn't have a drain fitting or a clean-out port, you will need to find some other way to get a suction hose to the bottom.
Mobile services are also available that draw all the fuel out of your tank and circulate it through a filtration system. This is known as "polishing" the fuel, and done properly it removes the majority of the sediment from the tank.
Fuel Lines
Proper fuel lines last a long time, but improper lines can shed internally and contribute to fuel contamination. Metal fuel lines are less susceptible to chemical deterioration, but the supply line connected to the engine must never be metal because movement and vibration will eventually cause the rigid line to crack. Flexible hose is unaffected by vibration and ideal for boat use. Makes sure the feed hose is Type A-1. If it is, that designation will be stenciled on the hose. Vent and fill hoses can be Type A-2. Fill lines should exhibit an uninterrupted drop to the tank; any dip that allows fuel to stand risks hose deterioration and fuel contamination.
Filters
There is a reason that the fuel filter mounted on a diesel engine is called the secondary filter. The engine manufacturer expects this filter to deal only with contamination small enough to have passed through the primary filter. Every diesel engine must have both a primary and a secondary filter, and the primary filter must remove water from the fuel. I prefer a primary filter with a clear sediment bowl, which should be inspected daily. Water in the bowl is visible evidence of water in the tank. If you need to drain the bowl (it has a plug just for this function) more often than every 100 engine hours, the tank needs cleaning.
Filters should be changed when they are dirty, but unless your primary filter is fitted with a vacuum gauge (which reveals the extent of restriction), you will need to change the element at some regular engine-hours interval. Your engine manual should specify. In recognition that the primary filter captures most of the contaminants, it is a common and generally acceptable practice to change the secondary filter element at every other primary filter change.
Overflow
Too often the first indication that a tank is full is fuel flowing from the vent line. Such overflow, if it gets into the water, is both illegal and reprehensible. Simple, inexpensive systems are available to capture overflow. Fitting your boat with one of these will avoid embarrassment, the disgust of other boaters, and perhaps a significant fine.
Who Needs to Winterize?
Of all 50 states, which would you guess had the most freeze-related claims? New York? Maine? Michigan? Guess again.
An examination of the BoatU.S. Marine Insurance claim files found that balmy California had more winterizing claims than any other state, including any of the “deep freeze” states.
While winters may be much colder in the deep-freeze states, the bitter temperatures are a fact of life and preparations for winter are taken very seriously. But in the more temperate states, like California, Florida, Texas, Louisiana, Alabama, and Georgia, winter tends to be relatively comfortable in most areas with only an occasional cold spell. But if the forecasts call for a cold snap, and they aren’t taken seriously, they can do a lot of damage.
Storage Ashore
In some parts of the country, where winter means several months of bitterly cold weather, storing boats ashore is the norm. In warmer climates, however, ice and snow may occur infrequently, and the choice between storage ashore and storage in the water is open to discussion.
Storage in the water means you might get a jump on the boating season next spring. On the other hand, boats stored ashore (on high ground) won’t sink. If you have a choice, storage ashore is a safer bet.
Storage ashore may also be less expensive over the life of a boat, since a hull surrounded by air for several months each winter is less likely to develop blisters than a hull that remains in the water. These blisters, the fiberglass equivalent of rot, occur on many boats when water soaks into the laminate below the waterline.
One note of caution:
The vast majority of the problems in temperate states involved boats that were being stored ashore. Since water retains heat longer than air, boats surrounded by air are more vulnerable to a sudden freeze than boats surrounded by water.
Storage ashore may also be less expensive over the life of a boat, since a hull surrounded by air for several months each winter is less likely to develop blisters than a hull that remains in the water. These blisters, the fiberglass equivalent of rot, occur on many boats when water soaks into the laminate below the waterline.
Even a brief cold spell that lasts only a night or two can do considerable damage. In temperate states, boat owners must winterize engines and freshwater systems, especially when boats are stored ashore. In deep freeze states, boats stored ashore must be winterized earlier than boats stored in the water.
Storage in Water
If the boat must be left in the water, the thru-hulls have to be protected by closing all seacocks and gate valves. Leaving a thru-hull unprotected over the winter is like going on an extended vacation and leaving your home’s front door open.
Failure to close thru-hulls is a major cause of loss in the BoatU.S. insurance program. In a recent study of 40 winter-related claims, seacocks or gate valves left open caused or contributed to the sinking of seven of the boats in the sample group.
If the boat must be left in the water, the thru-hulls have to be protected by closing all seacocks and gate valves.
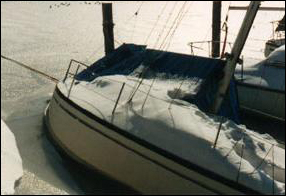
This boat in Maryland sank when it's plastic thru-hull was shoved underwater by the weight of the snow. the intake was broken by ice (the surveyor who inspected the damage suspected that it was already cracked) and water flowed into the boat.
It should be noted that raising and refurbishing a boat that sinks, even at a dock, is a daunting job that can keep the boat in the repair yard for many weeks over the spring and summer. Whenever a boat is stored in the water over the winter, all thru-hulls, with the exception of the ones for cockpit drains, must be closed or it could be on the bottom next spring.
And all thru-hulls, especially the ones for the cockpit drains, must be double-clamped with stainless steel hose clamps at each end. This is critical. When water freezes it expands and will lift a poorly secured hose off of a fitting. The hose itself is also important. Lightweight hose and PVC tubing can rupture or crack. Use only a heavily reinforced hose, especially at cockpit drains.
If your boat has thru-hulls below the waterline that can’t be closed, either because they are mechanically frozen open or have broken (typical with gate valves, which is why they are not recommended), it should be stored ashore for the winter.
Seacocks are closed by moving the handle down so that the handle is parallel to the hull. Gate valves are closed by turning the wheel clockwise.
After the seacock or gate valve has been closed, remove the hose so that it drains and then use an absorbent cloth or turkey baster to eliminate any residual water, which can freeze and crack the nipple.
Taking off the hose also assures you that the valve has closed properly. Reinstall the hose immediately and secure the two clamps.
It should be noted that thru-hulls above the waterline are not required to have seacocks and most don’t. That doesn’t mean that these thru-hulls aren’t vulnerable.
Ordinary plastic thru-hulls deteriorate in sunlight and have been broken when they were shoved underwater by the weight of snow and ice in the cockpit, which then sinks the boat. Plastic thru-hulls near the waterline are especially vulnerable and should be replaced with bronze or Marelon (the latter is the only type of plastic approved for marine use by U.L.).
Electrical Connections
Whether adding new electrical gear or rewiring something already aboard, the requirements for a reliable and safe electrical connection are the same. You need the right wire, the right terminal fittings, and a couple of inexpensive hand tools.
Wire
A wire could hardly find a more hostile environment than aboard a boat. On-board wiring is salted and doused, shaken and whipped, crushed and abraded, exposed to sunlight, subjected to heat, and coated with petroleum. Neither lamp cord nor house wiring will long endure these conditions.
Choose your wire carefully. Never use solid wire on a boat. Wave-or motor-induced oscillations eventually fracture solid wire. Boat wiring must have the flexibility stranding provides. Boatbuilders save a few dollars using type 2 wire, but a boatowner should use only the most flexible wire, called type 3.
The wire must be copper, but even copper corrodes in the marine environment, and corrosion is the primary cause of electrical failures on a boat. Plating each strand of the wire with a thin coat of tin-called tinning--dramatically improves corrosion resistance. The additional cost of tinned wire is nominal, the benefits substantial. Under normal circumstances use only tinned wire.
Stranded single-conductor wire is called hook-up or primary wire. Since most after-construction wiring requires two wires, duplex wire is more convenient and provides the added safety of a second layer of insulation. The best choice for most 12-volt wiring projects is duplex safety wire, where the twin conductors are red (positive) and yellow (ground). Making the ground wire yellow rather than black reduces the likelihood of confusing a DC ground wire with an AC hot wire-also black.
Boat Cable
In recent years wire designed for the marine environment has become widely available to boatowners. This wire is known as boat cable. Unfortunately the Underwriter's Laboratories standard that defines boat cable, UL 1426, is less stringent than commonly thought. Boat cable can be type 2, tinning is not a requirement, and the heat rating of the insulation can be quite low. When you select boat cable, type 3 is better, tinning is essential, and you want the highest heat rating-designated on the jacket as BC5W2 (105¡C in a dry environment, 75¡C wet). Tinned boat cable from a reputable supplier is your best choice for all wiring needs.
Size
As with water through hose, electricity flows more easily through larger wire. It is essential to size wire for the maximum current flow you expect it to carry. If the wire feeds a single item, the current requirements will be shown on a label or plate on the appliance, or in the accompanying manual. If the rating is in watts, divide it by 12 (assuming a 12-volt electrical system) to convert the rating to amps. When the wire is part of a circuit that supplies several appliances, the potential current through the wire is the sum of the current requirements of every appliance on the circuit. For example, if a circuit is comprised of six 25-watt cabin lamps, the wire will be carrying about 12 amps ([25 watts Ö 12 volts] x 6) when all the lights are on.
The requirements for reliable and safe electrical terminal fittings: you need the right wire, the right terminal fittings, and a couple of inexpensive hand tools.
To size wiring, you need the wire length from the power source to the appliance(s) and back to the power source. Doubling the straight line distance to the battery or electrical panel is not adequate. You must determine the actual length of the wire by measuring along the path it will follow-up, over, and around. It is not unusual for a wire run to be more than twice the straight-line distance.
Some voltage is used up pushing the current through the wire. This loss, called voltage drop, should not exceed 3%. The table shows what size wire is required to deliver adequate voltage to the other end. Use the potential current draw to select the row, the round trip wire length to select the column. The number where these two intersect is the wire size you need. Electrical wire appropriate for marine use will have the gauge designation printed on the insulation. The smaller the gauge number, the larger the wire diameter. Always buy wire at least a foot or two longer than your measurement. You can easily shorten the wire after it is installed, but lengthening it requires a highly undesirable splice. Each wire should be a single continuous run between terminals.
Connections
Other than chafe or lying against hot metal, wires rarely experience failures in the middle of a wire run. Almost all wiring problems occur at the connections. Never twist wires together to make a connection, and never wrap a bare wire around a terminal screw. You will minimize wiring problems if you terminate all wire ends with crimp connectors.
Selecting the proper connector requires that you match it to the wire gauge and to the size of the terminal screw. Ring terminals are your best choice unless the terminal screw is captive. In that case, use flanged spade connectors.
Use butt connectors for appliances supplied with wire leads instead of terminals. Step-down butt connectors let you connect heavy supply wires to lighter leads. To simplify servicing, it can be a good idea to make the connection with blade or snap connectors instead of butt connectors. Three-way connectors are useful for tapping into an existing circuit.
Terminals used on a boat must always be copper, never steel or aluminum, and like the wire, they should be tin-plated to resist corrosion.
Tools
Nine times out of ten, stripping insulation with a pocket knife results in nicked wire, which opens the door to corrosion. And you simply cannot make a dependable crimp connection with a pair of pliers. Every boatowner should own a wire stripper and a good-quality crimper. The cost is nominal. Strippers sold by auto supply and hardware stores are for SAE wire, which is about 10% smaller than AWG, so these strippers will nick AWG wire. Be sure the wire stripper you buy is intended for AWG wire.
An inexpensive pliers-type crimper is more than adequate for a few connections, provided you make a few practice crimps first. But if you will be making a lot of connections, a ratchet crimper offers the benefit of consistency, even in the hands of an amateur.
Crimping
Remove only enough insulation for the wire to reach the end of the barrel of the terminal. Grip the terminal in the correct die in the crimper, fully insert the wire into the terminal, and squeeze. If the barrel has a seam, the crimp indent should be opposite.
Better terminals feature a brass sleeve that can be crimped over the insulated wire to add mechanical strength. This type of terminal is usually installed with a double crimp tool. If your crimper doesn't have a double-crimp die, crimp the terminal to the wire first, then reposition the crimper and crimp the sleeve to the insulation.